
 Important
Please verify the following four key items prior to troubleshooting:
• If security restrictions are active on your wireless router, turning off these settings may resolve the issue:
· Privacy Separator / SSID Separator / Network Isolation Function

• Ensure your computer or smartphone is connected to the same frequency band as the printer (either both on 2.4 GHz or both on 5 GHz). This can significantly enhance connectivity.
• Deactivating the Band Steering function on your wireless router may help resolve connection conflicts.
• If 2.4 GHz and 5 GHz networks share the exact same SSID, reassigning unique SSIDs to each band can resolve detection issues.
    - Frequency Band: Wireless communication operates on either 5 GHz or 2.4 GHz bands.
    * Band Steering function: Automatically monitors the Wi-Fi environment and dynamically assigns devices to the optimal frequency band (2.4 GHz or 5 GHz) based on real-time network conditions.
· Understanding Wireless Frequency Bands (2.4 GHz vs. 5 GHz)
Reconfigure the printer setup under any of the following circumstances:
· When setting up a newly purchased computer or wireless router.
· When modifications have been made to your wireless router settings.
· When switching the printer's connectivity mode (e.g., changing between Wi-Fi and USB).
Step1: Check Basic Network Items
Check 1: Verify Power Status
Confirm that both your printer and networking equipment (wireless router, modem, etc.) are fully powered on.
If you are currently in the middle of setup, pause the process. First, verify that the wireless router (or modem) is powered on, then confirm the printer is turned on.
lCheck power for network devices (e.g., router): If they are off, turn them on. If they are already powered on, perform a power cycle by turning them off and then back on.
Please note that networking equipment may require a few moments to fully initialize and become operational after power-up. Continue only after the router and network devices are completely ready.
lCheck printer power: If the printer is off, turn it on. If it is already running, power it off and turn it on again.
Proceed to the next check once all power status checks are complete.
Check 2: Verify PC Network Connection
When your computer and network infrastructure (wireless router, etc.) are properly configured, your computer will be ready to establish a network connection.
Review your wireless router settings. Open a web browser to test internet connectivity by visiting any website. If web pages fail to load on your computer, examine the router's network configuration settings—such as IP address filtering, MAC address filtering, and DHCP functionality.
To identify the exact network name (SSID) of the wireless router connected to your printer, print out the printer's network status information page.
· Printing Printer Information (Self-Test Page)
· ■ Note
• Depending on your wireless router, different network names (SSIDs) may be assigned based on the frequency band (2.4 GHz vs. 5 GHz) or device type (PC vs. gaming console), often distinguished by alphanumeric suffixes at the end of the SSID.
• For detailed instructions on checking router settings, consult the user manual supplied with your wireless router or contact the device manufacturer.
• If your network utilizes an encryption key, make sure to specify it for the particular network name (SSID) you are connecting to. For complete details, see Configuring Encryption Key Settings
Check PC Network Connection: For specific setup procedures, refer to the user manual provided with your computer or reach out to the computer manufacturer.
After completing the setup for both the wireless router and your computer, configure your computer's settings using the router's configuration details so that internet access and web browsing are functioning properly.
Proceed to the next step once you have confirmed a stable network connection.
Check 3: Check Printer Network Settings & Status Light
Ensure that the LED indicator displays a solid Purple or solid Blue light. If the light shows solid green, or alternates between blue and green, the printer has not successfully connected to the wireless router.
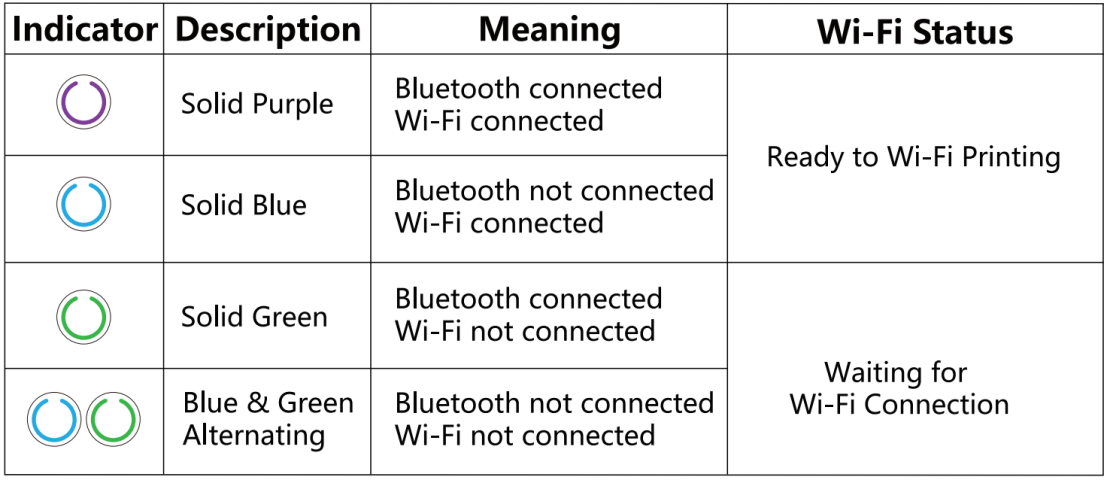
If the indicator shows waiting status, evaluate the physical distance and positioning of the wireless router and printer in the next step.
Check 4: Evaluate Wireless Router Placement and Physical Environment
Verify that the printer is not located excessively far from the wireless router. Position both devices in an open area free of physical barriers. Wireless signals degrade significantly when traveling across different rooms or floors, particularly when passing through dense structural materials like concrete or metal reinforced walls. If wall interference prevents Wi-Fi communication between the printer and computer, place both units in the same room.
Additionally, keep the router away from appliances that emit radio frequency interference on the same band, such as microwave ovens.
Step 2 Advanced Troubleshooting (If Issue Persists)
Check 1: Configure Firewall and Security Software Permissions
If your security software firewall is enabled, a prompt may alert you that 'JADENS_Printer_Driver' is attempting network access. Always select 'Allow' or grant full network access permissions. If you use network profile management software, verify its blocking rules.
Check 2: Optimize Wi-Fi Network Name (SSID)
For optimal hardware compatibility, we recommend naming your Wi-Fi network using simple alphanumeric characters (standard English letters and numbers only, avoiding special characters).
Check 3: Solve Network Troubles
See below.
Resolving 'Printer Offline' or 'Cannot Communicate' Issues